Download this article in .PDF format
This chapter is sponsored by:
Pressure controls (other than relief and unloading valves)
There are some parts of fluid power circuits that need pressure control. (Chapter 9 covered relief and unloading valves that control pressure in pump circuits.) Other types of pressure controls include sequence valves, counterbalance valves, and reducing valves. Though the internal works (and the symbols) are similar, these three pressure controls perform entirely different functions. Sequence valves and counterbalance valves are normally closed — like relief valves and unloading valves — but they usually allow bi-directional flow, so they need a bypass check valve in their bodies. Sequence valves always have an external drain connected directly to tank. Counterbalance valves are internally drained, except when used in some regeneration circuits.
Reducing valves are normally open and respond to outlet pressure to keep outlet flow from going above their set pressure. They also can have a bypass check valve. Reducing valves always have an external drain connected directly to tank. Any backpressure in this drain line adds to the valve’s spring setting.
Relief valves, unloading valves, sequence valves, counterbalance valves, and reducing valves are the most difficult to discern on a schematic drawing because their symbols are so similar. Take extra care when diagnosing a problem to make sure these valves are correctly identified and their function understood.
Sequence valves
There are times when two or more actuators, operating in a parallel circuit, must move in sequence. The only positive way to do this is with separate directional control valves and limit switches or limit valves. This setup assures the first actuator has reached a specific location before the next operation commences. If there is no safety concern or possibility of product damage if the first actuator does not complete its cycle before the second starts, a sequence valve can be a simple way to control the actuators’ actions.
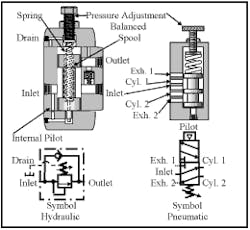
The symbols and cutaways in Figure 14-1 are for hydraulic and pneumatic sequence valves. The main difference between these valves is that most hydraulic sequence valves are single purpose and must be used in series with a directional control valve, while many air sequence valves are pilot-operated directional control valves with an adjustable spring return. In either case, a preset pressure must be reached before the valves allow fluid to pass or change flow paths. Many manufacturers offer a direct-acting internally piloted hydraulic sequence valve like the design shown in Figure 14-1. This valve can be changed to external pilot in the field if required.
Several manufacturers offer pilot-operated sequence valves also. Pilot-operated sequence valves stay closed to within 50 psi or less of their set pressure. Direct-acting sequence valves may partially open at pressures that are 100 to150 psi below set pressure — and thus allow premature actuator creep.
A balanced spool — held in place by an adjustable-force spring — blocks fluid at the hydraulic sequence valve’s inlet. When pressure at the inlet reaches the spring setting, pressure in the internal pilot line pushes the spool up to allow enough flow to the outlet to keep pressure from going higher. Pressure at the inlet never drops below set pressure when there is flow to the outlet. When outlet pressure exceeds set pressure, the valve opens fully and pressure at both ports equalizes. Notice that the drain port hooked to tank must be at no pressure or constant pressure because any pressure in this line adds to spring setting. (Remember that a sequence valve must always have an external drain.)
A bypass check valve allows reverse flow when the valve is used in a line with bi-directional flow. In some applications a sequence valve may be externally piloted from another operation. Most valves can be converted in the field. (The designer should always change the part number to reflect the conversion.)
Pneumatic sequence valves typically are 5-way directional control valves with adjustable springs to set their shifting pressure. They are used to start a second operation after the preceding one finishes. Some older machines have one solenoid valve to start the cycle and several sequence valves to extend and retract all other actuators. Some precautions:
• A sequence valve shifts on a pressure build-up and may start a second operation prematurely if an actuator stalls or is stopped for any reason. If personnel safety or product damage can occur due to an incomplete stroke, don’t use sequence valves. Instead, use limit switches or limit valves and directional control valves for each operation sequence.
• When flow controls are required they must be meter-in types. Take the signal to the sequence valve from the line downstream from the flow control because pressure at this point will be whatever is required to move the actuator and its load.
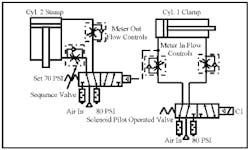
The circuit in Figure 14-2 is typical for air-powered machines. Cyl. 1 extends to clamp a part when an electrical input signal shifts the solenoid pilot-operated valve. As Cyl. 1 extends, pressure beyond the meter-in flow control at its cap end becomes as high as necessary to move the cylinder and its load. With the sequence valve set to shift at 70 psi, Cyl. 2 should not move until Cyl. 1 has extended and securely clamped the part. If the clamp does not make a full stroke for any reason, the Cyl. 2 extending prematurely will not damage the part or be unsafe. When the clamp is at 70 psi or higher, the sequence valve shifts to extend Cyl. 2. Both cylinders can return simultaneously without causing any problems.
One great feature of a sequence-operated circuit is it does not matter how far the first cylinder must move before the next operation takes place. Thick or thin parts are clamped at the same force before the next operation starts because pressure must build to the same level to trigger the next sequence.
Cyl. 2 has meter-out flow controls to retard its movement and hold pressure on Cyl. 1 during the stamping operation. De-energizing the solenoid pilot-operated valve allows both cylinders to return home at the same time.
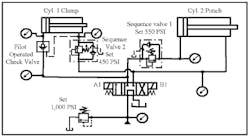
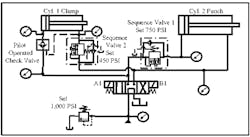
The hydraulic sequence circuit in Figure 14-3 is typical for a machine that must clamp and hold pressure while a second operation takes place. Sequence valve 1 is set at 550 psi; pressure at clamp Cyl. 1 must be at least 550 psi before punch Cyl. 2 can extend. While punch Cyl. 2 is extending, pressure in the circuit never drops below 550 psi. If the punching operation requires more than 550 psi, the pressure in the whole circuit increases -- up to the relief valve setting.
A pilot-operated check valve maintains clamp force while the punch cylinder retracts. The signal to open the pilot-operated check valve comes from the line between Sequence Valve 2 and Cyl. 1, so there is no signal until Cyl. 2 fully retracts. (This circuit is not safe if pressure buildup comes from some source other than clamp contact or the end of stroke so that the punch cylinder operates prematurely.)
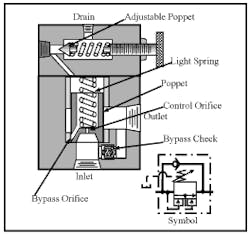
Sequence valves often generate a great deal of heat because the first actuator to move takes higher pressure than the subsequent actuators. This means there is usually a high pressure drop across a sequence valve that results in wasted energy. In some circuits, a kick-down sequence valve can reduce the energy loss. The cutaway view and symbol in Figure 14-4 show the inner workings of a kick-down sequence valve to explain how it controls opening pressure and then unloads it.
Fluid from the inlet flows through the control orifice and up to the adjustable poppet where it is blocked. The resulting pressure tries to open the poppet while equal pressure and a light spring acting on the opposite side hold it shut. When pressure increases enough to unseat the adjustable poppet and more flow starts passing the poppet than going through the control orifice, the pressure imbalance lets the poppet raise. When the poppet moves enough to let trapped fluid go through the bypass orifice, pressure on top of the poppet drops off -- because the bypass orifice is larger than the control orifice. At this point, the only force acting to hold the poppet shut is spring force and backpressure at the outlet port. When flow stops, the poppet closes again due to pressure equalization and spring force on the poppet.
The circuit in Figure 14-5 is the same as in 14-3 except it incorporates kick-down sequence valves in place of standard sequence valves. Cyl. 2 will not extend in this circuit until pressure on Cyl. 1 has reached 750 psi. The difference is when a kick-down sequence valve opens at its pressure setting, it allows fluid to pass at 50 psi plus whatever it takes to overcome downstream resistance. This means the whole circuit from the pump to all actuators is 50 psi plus Cyl. 2’s resistance. The pilot-operated check valve at Cyl. 1’s cap-end port keeps it pressurized at near full force, while Cyl. 2 extends at low force. Energy waste is very low so heat buildup is minimal. (Other sequence valve circuits can be found in the e-book Fluid Power Circuits Explained by the author of this manual, which will be launched in the next few months.)
Counterbalance valves
The fourth and last normally closed pressure control valve found in hydraulic circuits is the counterbalance valve. Cylinders with external forces — such as weight from a platen, machine members, or tooling — acting against them will overrun when cycled if oil flowing out of them is not restricted. A meter-out flow control circuit is one way to control overrunning loads but it has one main drawback. A flow control’s speed is fixed except for manual adjustment or when using an infinitely variable proportional type. Because flow is fixed, the actuator will continue at the same speed – even when working flow to it increases or decreases. Thus, control is minimal and there could be high energy waste. (Figure 13-8 shows a meter-out flow control circuit for running away loads.)
Download this article in .PDF format
This chapter is sponsored by:
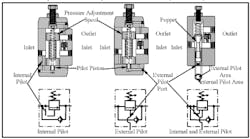
A counterbalance valve keeps an actuator from running away regardless of flow changes because it responds to pressure signals, not flow. A counterbalance valve is almost the same as a sequence valve except it normally does not have an external drain connection. The cutaways and symbols in Figure 14-6 depict the physical makeup of three different counterbalance valves and how they are represented on a schematic drawing.
The two cutaways and symbols on the left are spool designs with internal and external pilots. The valve on the right is a poppet design that is both Internally and externally piloted. Each valve type has advantages in different circuit arrangements that will be discussed later. A counterbalance valve usually has a bypass check valve for reverse flow because its most common use is in controlling actuators with running away or overrunning loads.
An internal pilot-operated counterbalance valve shifts to allow excess fluid to flow to the outlet when pressure at the inlet increases to the pressure set by the pressure adjustment. Pressure at the inlet never drops below set pressure when there is flow at the outlet. Flow from the inlet to the outlet is just enough so that backpressure on the actuator never drops below set pressure. This means the actuator moves only as fast as it is supplied and stops when Inlet flow ceases.
Pressure adjustment on the Internal-piloted counterbalance valve is usually made by first screwing the pressure adjustment all the way in. To assure that the valve is capable of high enough pressure, start the pump and raise the load a small amount. Then center the directional valve — which connects the cylinder rod-end port to tank — to see if it holds. If the load holds, next raise the load in increments — checking for load stop every few inches. With the load suspended, start reducing set pressure on the counterbalance valve slowly until the load creeps forward. When the load starts drifting down slowly, increase pressure until movement stops, then turn the pressure adjustment another quarter to half turn higher. This method of adjusting usually wastes less energy while it always stops and holds the load.
The main disadvantage of an internal pilot-operated counterbalance valve is that backpressure is constant and it holds back even when the actuator needs maximum force. Another disadvantage is that to maintain optimum performance, an Internal-piloted counterbalance valve must be readjusted every time the load changes. The valve’s main advantage is that it produces smooth cylinder action while advancing to the work.
An external pilot-operated counterbalance valve shifts to allow excess fluid flow to the outlet when pressure at the opposite cylinder port reaches the pressure set by the pressure adjustment. Pressure at the inlet never drops below load-induced pressure plus pressure set on the pressure adjustment when there is flow at the outlet. Flow from inlet to outlet is just enough that the actuator moves only as fast as it is supplied and stops when flow to the actuator ceases.
Pressure adjustment on the external pilot-operated counterbalance valve can be made on a test stand by setting the pressure adjustment at 100 to 200 psi. If pressure must be set on the machine, set the pressure adjustment higher than 200 psi and lift the load a small distance to make sure it stops and holds. If it holds, continue to raise the load high enough to have some time for the next step. Now, power the load down and observe pump pressure. Pump pressure while lowering the load should not exceed 200 psi. Continue this action until pump pressure is between 100 and 200 psi while the load is lowering. This method of adjusting usually wastes less energy while always stopping and holding the load.
The main disadvantage to an external pilot-operated counterbalance valve is that it may cause lunging or even stop cylinder action while advancing to the work. The main advantage is that backpressure is only present when the actuator is advancing to the work. At work contact, pressure at the actuator inlet increases and forces the counterbalance valve wide open, thus eliminating all backpressure. Another advantage is that an external pilot-operated counterbalance valve does not need to be readjusted when the load changes.
Internal and external pilot-operated counterbalance valves shift when pressure at the internal pilot area reaches the pressure set on the pressure adjustment and allows excess flow to go to the outlet. Pressure at the Inlet never drops below set pressure when there is flow at the outlet. Flow from the inlet to the outlet is just enough that backpressure on the actuator never drops below set pressure. This means the actuator moves only as fast as it is supplied and stops when Inlet flow ceases.
Pressure adjustment on an internal and external pilot-operated counterbalance valve is usually made by first screwing the pressure adjustment all the way in. To assure that the valve is capable of high enough pressure, start the pump and raise the load a small amount. Then center the directional valve that has the cylinder rod-end port connected to tank — to see if it holds. If the load holds, then raise the load in increments — checking for load stop every few inches. With the load suspended, start reducing set pressure slowly until the load creeps forward. When the load starts drifting down slowly, increase pressure until movement stops, then turn the pressure adjustment another quarter to half turn higher. This method of adjusting usually wastes less energy while always stopping and holding the load.
An internal and external pilot-operated counterbalance valve lowers loads smoothly and opens fully when pressure at the actuator inlet increases upon contact with the work. The valve does need to be readjusted when loads change, but this is a small price to pay for good control.
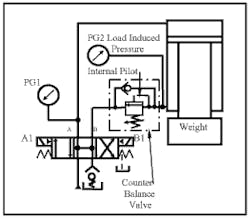
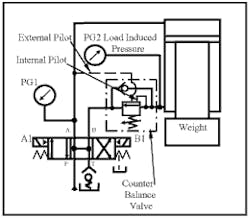
Figure 14-7 depicts a vertically oriented cylinder with rod facing down and a load trying to extend it. To keep the cylinder from running away, the counterbalance valve must resist the load-induced pressure from the weight. The load-induced pressure can be calculated and the counterbalance valve could be preset at 100 to 150 psi higher on a test stand, but pressure adjustment is usually done at the machine (as mentioned earlier).
Notice that the directional control valve has ports A and B connected to tank in the center condition. There is no chance of extra pressure buildup in the pilot line while the circuit is at rest. If ports A or B were blocked, pressure could build and pilot the counterbalance valve open, allowing the cylinder to drift.
Energizing solenoid A1 sends pump flow to the cylinder cap end. As pressure builds there, pressure also increases in the rod end. When pressure at the cylinder rod end reaches 100 to 150 psi above the load-induced pressure, the cylinder starts to extend as fast as the pump fills the cap end. When flow increases, cylinder speed increases and when flow decreases, cylinder speed decreases.
As stated in the counterbalance valve explanation, backpressure at the cylinder rod end is present during the entire extend stroke. As a result, at work contact cylinder force is reduced by counterbalance pressure times the cylinder’s rod-end area. The total weight of the platen and tooling on a press plus the amount of added pressure at the counterbalance valve cannot be used to do work. Energy is expended to raise the weight but it is not recouped during the work cycle. Energizing solenoid B1 sends fluid around the counterbalance valve through the bypass check valve and on to the cylinder rod end to retract it.
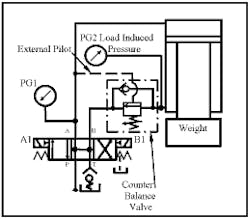
The circuit in Figure 14-8 shows the same cylinder with an external pilot-operated counterbalance valve. An externally piloted valve can be set at approximately 100 to 200 psi regardless of load-induced pressure in the cylinder. This is especially convenient in applications where loads constantly change. It is also the best use of energy because the counterbalance valve opens fully when the cylinder meets resistance so the weight is able to do some work. Because backpressure on the cylinder rod end is zero, more force is available.
Energizing solenoid A1 sends fluid to the cylinder’s cap end to start it extending. As pressure builds in the cylinder cap end, it pressurizes the external pilot and opens the counterbalance valve The valve only opens enough to let fluid out when the cap end is at pilot pressure. If pilot pressure is set too low, the counterbalance valve may quickly open too far — allowing the cylinder to run away and pilot pressure to drop. At this point, the counterbalance valve shuts abruptly and the cylinder stops. Almost immediately, pressure again builds at the cylinder cap end, the counterbalance valve reopens, and the same scenario repeats until the cylinder meets resistance. A meter-in flow control in the external pilot line can help, but is very difficult to set. Energizing solenoid B1 sends fluid around the counterbalance valve through the bypass check valve and on to the cylinder rod end to retract it.
The internal and external pilot-operated counterbalance valve in Figure 14-9 incorporates the best features of both valves. The internal pilot provides a smooth advance stroke at low force, while the external pilot opens the valve fully to eliminate backpressure from the cylinder rod end when it contacts the workpiece. (Like the internally piloted valve. this version must be reset at each load change to maintain its efficiency and keep energy losses low.)
The symbols in these example circuits show a direct-acting pressure control valve. Several suppliers offer a pilot-operated version that is more stable and has less pressure differential between cracking and full flow operation.
The circuits shown here work equally well with hydraulic motors, except that a counterbalance valve will not stop and hold a running away load on a motor without creep. All hydraulic motors have internal leakage that increases as the motor wears. The counterbalance valve may not have any bypass but fluid will slip by the motor parts no matter what its design.
There are no counterbalance valves for air circuits. Air circuits depend on meter-out flow controls to keep an actuator from running away. Usually an air circuit uses a 2-position valve that keeps pressure on the retract side at rest so it stays in place at end of stroke. When a load must be stopped in mid-stroke, a 3-position valve with cylinder ports blocked in center is the common method of trying to do this. There also is available a pilot-operated check valve for air service that gives some control for stopping and holding a pneumatic cylinder in mid-stroke.
Air line regulators
Download this article in .PDF format
This chapter is sponsored by:
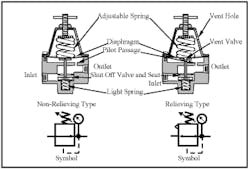
Most plant air systems produce pressures between 90 and 125 psi, while most air circuits are designed to operate at 75 to 85 psi. Other systems may operate at pressures as low as 15 to 20 psi. To accommodate these ranges, some method is needed to reduce the system pressure without wasting energy. A relief valve that would release plant air to atmosphere and try to lower the whole system it is not a good solution. The air line regulator shown in Figure 14-10 reduces outlet pressure by shutting off flow when downstream pressure tries to go above the regulator’s setting. There is very little energy loss because air merely expands from its elevated pressure to meet the lower pressure requirement. In other words, an air compressor operating at 120 psi only has to run about a third as often when regulated or reduced to 40 psi.
This points out the main reason why an air line regulator should be set just high enough to do the job at hand. Without a regulator, not only does it cost more to operate a machine, but the machine tries to run a repetitive cycle with fluctuating pressure, therefore different forces and speeds.
The cutaway views and symbols in Figure 14-10 show two common direct-acting air line regulators. They are normally available in sizes from â through 2 in. with pipe thread. (Larger sizes are built but they usually are pilot-operated from a small direct-acting regulator.) Air flows freely from inlet to outlet until the outlet pressure reaches the set pressure. The adjustable spring holds the shut-off valve off its seat by extending the diaphragm during free flow. As pressure at the outlet continues to build, it passes through the pilot passage to the underside of the diaphragm. At set pressure, the diaphragm pushes the adjustable spring back, allowing the shut-off valve to seat. The light spring pushes the shut-off valve closed. Pressure at the outlet now is stable at its reduced setting — as long as the inlet pressure is equal to or higher than the outlet. Any pressure drop at the outlet reduces pressure under the diaphragm and the adjustable spring again pushes the shut-off valve open to let more air in.
If there is a possibility of the reduced pressure line seeing excess pressure for any reason, use the relieving-type regulator shown on the right in Figure 14-10. This valve closes a hole through the diaphragm’s center section with the shut-off valve’s stem. After reaching set pressure, the shut-off valve cannot move up. Any extra pressure buildup under the diaphragm raises its center section off the shutoff valve’s stem and allows air to flow to atmosphere through the vent hole. This feature should not be used as a relief valve function where pressure increases during every cycle -- it is only for occasional overpressure situations.
Every pneumatically powered machine should have a regulator set for the lowest pressure that will produce good products. Costly overpressure should be eliminated in every case. Use an air line regulator anytime a job can be done at a pressure lower than plant air supply.
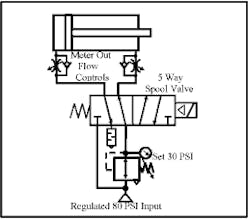
Another application for air line regulators that can save compressor output is reducing pressure on the return stroke of actuators that can use low power to retract. Many cylinders need high force to extend and do work, but the retract portion of the cycle needs very low force. An air line regulator positioned as shown in Figure 14-11 can save air during part of every cycle on many cylinder operations in most circuits.
A 5-way spool valve, piped with a dual-pressure inlet as shown, can give normal cycle time while conserving plant compressed air. Return pressure is set on the regulator supplying the cylinder rod end at the lowest possible pressure that maintains cycle integrity. A reduction as small as 20 psi below working pressure can pay for the regulator in a short time. Shifting the 5-way valve starts the cylinder extending. (There will be a brief lunge as the lower-pressure air in the rod end compresses to hold back against the higher pressure in the cap end.) To control cycle time, adjust cylinder speed with the rod-end meter-out flow control. When the 5-way valve shifts again to return the cylinder, the meter-out flow control on the cap end must be adjusted for a faster rate because return power is limited.
Pressure-reducing and reducing//relieving valves
Download this article in .PDF format
This chapter is sponsored by:
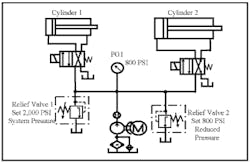
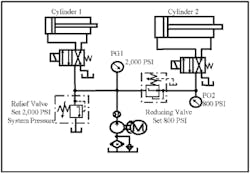
There are times in multi-actuator hydraulic circuits when system pressure is too high for some actuators while others need maximum force. One suggested remedy is the circuit in Figure 14-12. Cylinder 1 needs 2000 psi to maintain force, while Cylinder 2 can damage the product when pressure exceeds 800 psI. Adding Relief Valve 2 (set at 800 psi) takes care of Cylinder 2’s overpressure, but limits the entire circuit to 800 psi. Pressure in a circuit with more than one relief valve will never be higher than the setting of the lowest valve. The correct way to have two or more pressures in a single circuit is to incorporate reducing valves. (Figure 14-14 diagrams a circuit using a reducing valve to give two pressures.)
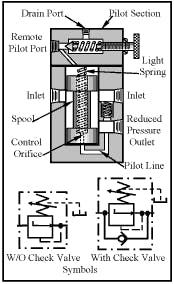
The cutaway and symbol in Figure 14-13 depicts a pilot-operated reducing valve that allows flow from the inlet to the reduced-pressure outlet until pressure reaches the setting on the direct-acting relief valve in the pilot section. Unlike the other four pressure controls (relief, unloading, sequence, and counterbalance valves), a reducing valve is normally open and blocks flow at set pressure.
The normally closed direct-acting relief valve in the pilot section traps fluid from the reduced-pressure outlet port through the control orifice on top of the spool when pressure is below its setting. The spool stays in the normally open position because pressure on both ends balances it hydraulically while the light spring keeps it pushed down. As pressure at the reduced-pressure outlet port continues to increase, it finally starts to open the direct-acting relief valve in the pilot section. Some fluid then flows to tank through the drain port. When flow through the direct-acting relief valve is more that the control orifice can handle, pressure on top of the spool drops and pressure on the bottom of the spool pushes it closed. The spool never closes completely because there is flow through the drain port anytime pressure at the outlet is lower than at the inlet. Drain port flow amounts to about 60 to 90 in.3/min. This flow is all wasted energy and it can cause a system to overheat if more reducing valves are installed than necessary. When pressure drops below the direct-acting relief valve’s setting in the pilot section, the valve closes and forces the spool to the open position.
A reducing valve is normally open so it appears reverse flow should not be a problem. However, when the valve is working, it is almost closed — and it can be held closed by back flow when the actuator starts to return. Anytime a reducing valve must pass reverse flow, select a valve with an integral bypass check valve to eliminate the possibility of blocked return flow.
It also is very important to have a free-flow drain port with very low (or even no) backpressure. Backpressure in the drain port adds to the setting of the direct-acting relief valve and can cause erratic results when drain pressure fluctuates. (Our next e-book, Fluid Power Circuits Explained, discusses how this drain port can be used advantageously in a dual-pressure circuit. This book will be launched in the next few months.)
The modified circuit in Fig, 14-14 allows two pressures without lowering system pressure (as happened in Figure 14-13). A pressure-reducing valve in place of Relief Valve 2 makes it possible to set pressure for Cylinder 2 without affecting pressure at Cylinder 1. This reducing valve never has reverse flow so a bypass check valve is not required.
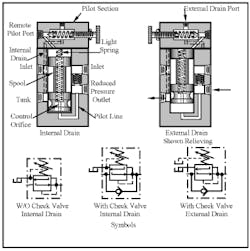
When it is working, a reducing valve is nearly closed and will pass very little reverse drain flow unless it has a bypass check valve. Even then, reverse flow must be at a pressure greater than that at the inlet. If this much pressure cannot be tolerated, use the reducing/relieving valve depicted in Figure 14-15.
Reducing/relieving valves function exactly like reducing valves — until an external force starts to increase pressure at the reduced-pressure outlet above the pressure set by the pilot section. When outlet pressure is 4 to 6% above set pressure, the spool moves up until the outlet is connected to tank. Any fluid at pressure above set pressure returns to tank, so outlet pressure does not continue to climb. Tank flow comes only from the reduced-pressure outlet, not from the pump through the inlet. When excess pressure at the outlet drops, the reducing/relieving valve continues to perform its reducing function.
Note that the left cutaway view has an internal drain for the pilot section. This saves connecting a separate drain line for pilot flow. However, when backpressure in the tank line is high or may fluctuate due to other return functions, it adds to the pilot-section setting and can elevate pressure at the reduced-pressure outlet above allowable rates. When tank-line backpressure may be high or when pressure fluctuations cannot be tolerated, use a valve with an external drain. When reverse flow is necessary, specify a model with an integral bypass check valve for piping convenience.
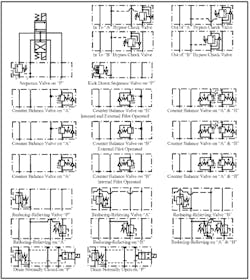
Figure 14-16 shows most of the modular valve configurations for sequence, counterbalance, and reducing valves. Modular valves simplify piping and eliminate many connections that can generate backpressure or add potential leakage points.

